Tuesday, December 6, 2011

[KTX] How to install English Voice in RM2

The voice files loaded on to original Robovie Maker2 are all in "Japanese"...
Here is a little instruction to change the voice to your language.

  1. Go to the directory where RM2 is installed.  By default, it is under Program Files or Program Files (x86). You should find a folder "RobovieMaker2".
  2. Inside the folder, look for a folder name "robovie***_def".  *** should represents your robot model.  For Regular KTX (17 DOF), the folder name is "roboviexe_def".  
  3. Inside the "robovie***_def" folder, go to a folder "X Voice Files". 
  4. Look for some voice files that you want to change... For example, greeting voices can be found in "Other" folder.   
  5. Create your own voice file.  To replace those voices without modifying the motion files, you have to use the same voice name.  Replace them and use the same name it was used in the original file.  Remember, the voice file has to be "***.wav" format, and file size has to stay really small.  You can download sample english voice files from here >>.  Copy the "Other" folder and replace with your original folder.
  6. Start RM2 and create new robot project.  Go to created project folder, it should have updated voices.  If you initialize your robot when you creating new project, it will overwrites current configurations you already have on your robot, such as calibration and Sensor offset values, etc....  If you do not want to change any configurations, please do not connect your robot and uncheck the "initialize" check box.  Once you have the project created, you can connect your robot and transfer the updated preference with new sound files.
<!> If you want to change voices in existing project, look for the voice file inside your project folder and replace it with your own voice file and name it as the same as original file.  

<!> If you need more space to store sound files, buy our MP3 Player Expansion Board. You can save your files up to 2G. 

Monday, October 10, 2011

[KTX] Placing Gyro / Accelerometer Sensor

Gyro / Acceleration Sensor Board helps balancing KTX walking and acrobatic motions.
The kit comes with sensor board and cable, screws.
- Sensor board x1
- IX-Bus Cable x 1
- M2-4 Non-Tapping Screw x 4

Installation
Tools:  
- Phillips-head screw driver P.1
- Phillips-head screw driver P.0 or P.00 
* For M2 screws, I normally use P.00 screw drivers; however, the head size varies a little by the make, chose best fitting screw driver to prevent damaging the screw head.
- Loctite
* Apply a little to the screw thread when the screw is screwed into threaded metal parts. 

Step1:  Take off the body plates and ...
Using P.1 screw driver,Take off the front and back body plate off.  There are 4 screws on both front and back.  If you have remote receiver connected, take it off.  Also, take off the battery, too.

Step2:  Take off the sensor bracket and left arm.
Take off the sensor bracket.  There are 2 screws on both front and back.

Step3:  Connect cable to the sensor board
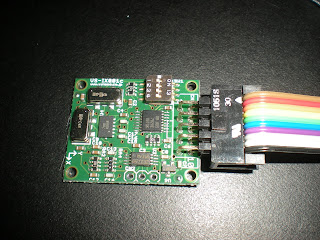
Connect IX-Bus cable to the sensor board.  Make sure the orientation of the cable is correct.  You should have brown cable connected to pin #1 as shown in above picture.  Also, make sure the dip switch is set to all OFF.  For more information, please look at setup document here.  

Step4: Place sensor board on the bracket
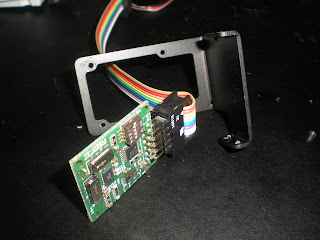
Run the cable through the hole of the bracket as shown in the picture.
Using P.00 (or P.0) screw driver, screw the sensor board on the bracket with 4 M2-4 non-tapping screws.  Don't forget Loctite!!!

Step5:  Place the sensor bracket back on the robot
Take off 4 M2-4 screws that holding the CPU board and slid the board to the right.
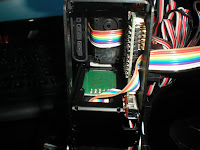
Run the IX-Bus cable through the space between the CPU board and the back side metal plate.
Mount the sensor board bracket.  Screw 2 M2-4 on both front and back.

Step6:  Place the left arm
 Place the left arm on the robot.  Please make sure not damaging the IX-Bus cable. Screw 2 M2-4 on both front and back.

Step7:  Connect the servo cables of left arm 
Connect the left arm servo cables onto CPU board.  From the left top, it should be the order of left shoulder pitch, left shoulder roll, left elbow.  The light color (Gray) cable should be facing inside the CPU board.

Step8:  Connect IX-Bus cable to the CPU board
Connect the IX-Bus cable to the CPU board.

Step9:  Put everything back
Put everything back on the robot such as remote receiver, body plates, and battery.
* I normally leave the battery unplugged, so that it won't runs out the charge.

Step10: Setting up the board using RM2
Go to this link and open or download PDF file, and follow the instruction!!!

Thursday, June 30, 2011

[Robot Parts] VS-BT001 ~ Bluetooth Module for KTX ~


Overview

Bluetooth Serial Communication Module “VS-BT001” is a communication module compatible with Bluetooth Serial Port Profile SPP.
This module supports
KTX
BeautoRover
RoboNova
Etc…
By installing this module on to your robot, you can control it from Android phone, PC , or any other device has programming capability using Bluetooth communication.

Specification
  • Size:  W 35mm × D 38mm × H 16.5mm
  • Weight:  8g
  • Input Voltage:  +3.3V ~ +5.0V
  • Max Current at Power ON:  50mA
  • Max Current at Waiting (no SPP communication established):  10mA
  • Max Current at SPP Communication established:  20mA ~ 30mA
  • Bluetooth Model:  Bluetooth(R)2.0  Class 2
  • Signal:  Max 30m
  • Bluetooth Profile:  SPP, GAP, SDAP
  • Serial Communication
    • Setup at shipment:  115200bps, no parity, 1 stop bit, two wire communication speed 2400bps~921.6kbps (11 steps)
    • Data length:  8 bit
    • Voltage level:  +3Vp-p, or +3.3~5.0V
Controlling from PC
VS-BT001 is a Bluetooth serial port SPP enabled device.  Using RFCOMM protocol, it can communicate with a virtual communication port of an external PC.   You can easily develop an application for your wirelessly controlled robot, by accessing the com port.

Android App

There is a sample app called “VS-C2 for Android” available at android market.  By installing this app on your android phone, you can control your robot from your phone as you do on PS2 remote controller.
VS-C2 for Android
- Remote feature like PS2 remote
- Voice command input
- Analog input using accelerometer of the phone
Android is an open platform.  You can develop your own application to control your robot using camera, speaker, mic, 3G network, accelerometer, etc….

Development
Using the Bluetooth module, you can control the robot wirelessly from PC or any other devices supports blutooth communication.  One of the interesting development would be vision processing using wireless camera.  You can mount a small wireless camera on your robot and connect it to your pc. You pc will capture the camera image and process it then send command to the robot to do some behavior corresponds to the image input.  Also, it can be used for researching communication between robots.


Thursday, May 26, 2011

How to use KTX (VS-RC003) SDK ~ Real Time Speed Control ~

Overview
Here is my Speed Control Example using VS-RC003 SDK.
It will allow you to set the goal position and its speed for multiple servos, and detect whenever it reaches to the goal position.

It only supports up to 19 servos for speed control without synchronized frame, and supports up to 18 servos for speed control with synchronized frame.

The example is only implemented for Head Yaw servo, but you should be able to add more servos easilly.
Motion files are already set for the use of multiple servo...

Please complete or read through previous examples before start working on this example.


1.  Download SDK Example
Please download latest example from this link, and extract the file into your working directory.

2.  Compile the Project
Now open the solution file from VC++ or VStudio and build the project.

3.  Understand the Logic
In the motion file, it will do following process.
loop(infinite){
  if (next frame is signaled){
    if(currentPosition + incStepSize < goalPosition){
      currentPosition += incStepSize
    }else if (currentPosition){
      currentPosition -= incStepSize
    }else{
      currentPosition = goalPosition
    }
  }
  processFrame()
}

In the example application, it will do following.
updateGoalPosition(newGoalPosition)
loop(){
  signalNextFrame()
}

4.  Setup your robot
Connect your robot to your PC, and change the servo output parameter, so that it can support this example.
In the example, I'm using following variables to keep the values.

//user defined variable numbers
#define GAIN  64
#define FRAME 65

#define HEAD_YAW_CURRENT_POSITION 68
#define HEAD_YAW_GOAL_POSITION           69
#define HEAD_YAW_STEP_SIZE               70

In the preference, add one more calculation as following.
+ 1400 x Va*[64]/256 x Vb*[68]/256  Always enable

Then, upload the configuration to the CPU board.

5.  Assign motion file
Assign motion file to the example application.
Open "MotionController.cpp"  and check the line  41 and 55.

void MotionController::initVsrc003(){
       m_vsrc003 = new Vsrc003("../Sample Motion/KTX-PC/initMotion.txt");

       //initialize variables
       //set all zeros to the variables will be used
       m_vsrc003->SetValue(GAIN, 0);
       m_vsrc003->SetValue(FRAME, 0);

       m_vsrc003->SetValue(HEAD_YAW_CURRENT_POSITION, 0);
       m_vsrc003->SetValue(HEAD_YAW_GOAL_POSITION, 0);
       m_vsrc003->SetValue(HEAD_YAW_STEP_SIZE, 0);

       //set default value for the gain
       SetGain(DEFAULT_GAIN_VALUE);

       m_vsrc003->LoadMotion("../Sample Motion/KTX-PC/RealTimeSpeedControl.txt");
       //m_vsrc003->LoadMotion("../Sample Motion/KTX/MoveHead.txt");
       m_vsrc003->ServoPowerOn();
       m_vsrc003->PlayMotion(-1);  //-1 for infinit loop
}
Make sure that you are using the motion files corresponds to your robot.


6.  Set Goal Position
Open "main.cpp" and go to line 30 and 35.

void main(){
      
       MotionController motionController = MotionController(true, true);
       motionController.Startup();

       cout << "\nPlease press ESC to stop playing motion";
      
       bool loop = true;
       do{
              /**************************
              In the motion file, there is a pose which has a step size 001 (0.016666 sec).
              To maintain the accuracy of the synchronization, 
              use value greater than 16 for the sleep function.
              **************************/
              Sleep(16);
              if(GetKeyState(VK_ESCAPE) & 0x80){
                     cout << "\nESC is recognized.  Cancel playing motion.";
                     //motionController.CancelMotion();
                     loop = false;
              }else if(GetKeyState(VK_DOWN) & 0x80){
                     motionController.ChangeStepSize(HEAD_YAW, 500);
                     Sleep(16);
                     motionController.ChangeGoalPosition(HEAD_YAW, -9000);
                    
              }else if(GetKeyState(VK_UP) & 0x80){
                     motionController.ChangeStepSize(HEAD_YAW, 100);
                     Sleep(16);
                     motionController.ChangeGoalPosition(HEAD_YAW, 9000);
                    
              }else{
                     motionController.MoveToNextFrame();
              }

       }while(loop);

       motionController.Shutdown();

       return;
}
Change the goal position to the value within the range your robot can support.
100 steps equals to 1 degree.

7.  Run the example
Click on start debugging and start the program.
Push Up or Down allow key, it will move the servo.

Wednesday, April 27, 2011

[Programming] OpenCV2.2 on EclipseIDE C++ Face Detection Example

Overview
I will demonstrate how to create OpenCV projects on Eclipse IDE for C++.

Goal here is to create Face tracking example using Eclipse IDE!!!
I will follow the information on this page>> written by
It is written for OpenCV2.0, so the instruction should apply to the OpenCV2.2 also...

1.  Install MinGW
You can download "Automated MinGW Installer from this page>>.
If you have older version installed, uninstall it and delete all the contents inside your C:/MinGW folder.
The one I'm using in this demo is "mingw-get-inst-20110316.exe".
When the installer asks for components to install, I selected select...
 - C++ compiler
 - ObjC Compiler
 - MinGW Developer ToolKit
Select whatever you think you would need for your further development.
I think, we just need C++ compiler for this demonstration ...
<!> After the installation, check your system path to see if "C:\MinGW\bin" is included or not...
On my machine, even if I marked the checkbox for adding path to system during the installation, it did not add the path... So, I did it manually.
Here is a link to the page explains how to add the path...
Do not forget restarting your PC!!!

2.  Install Eclipse
You can download Eclipse IDE from this page >>.
The version I'm using is "eclipse-cpp-helios-SR2-win32.zip".
After finish downloading, extract it to the place that you want...
I placed eclipse folder like this =>  C:\eclipse-cpp-helios-SR2-win32\eclipse\eclipse.exe
Create shortcut of eclipse.exe and place it on your desktop.

3.  Install OpenCV 2.2
OpenCV2.2 does not support MinGW by default... you have to create it by yourself.

I used this page as a reference...It is written for a Code Block...

3.1  Install Cmake
You will need "Cmake" to build your OpenCV for MinGW...
You can download it from this page>>.

3.2  Download and Extract OpenCV2.2-win.zip
Download "OpenCV-2.2.0-win.zip" from this page.
Extract the file under "C:/" (this can be anywhere... but if you have a " "(space) in your path, you will get error later...).
I extracted into "C:\OpenCV-2.2.0-win\OpenCV-2.2.0".

3.3  Run Cmake (cmake-gui)
3.4  Set  the source code "C:\OpenCV-2.2.0-win\OpenCV-2.2.0"
3.5  Set where to build the binaries e.g. "C:\OpenCV2.2MinGW"
3.6  Press Configure
3.7  Let Cmake create the new folder
3.8  Specify the generator "Eclipse CDT 4 - MinGW Makefiles". 
3.9  Select "Specify native compilers" and click next
3.10  For C, set "C:/MinGW/bin/gcc.exe".
3.11  For C++, set "C:/MinGW/bin/g++.exe".

3.12  Click Finish
<!> If your MinGW/bin is not added to your system path, it will generate a error says missing dll

3.13  In the configulation screen
Look for "CMAKE_BUILD_TYPE" and type in "DEBUG" or "Release".
Select Build Examples if you want...

3.14  Click Configure Again
3.15  Click generate
3.16  Close cmake

3.17  Make OpenCV
Go to the command prompt and inside the folder "C:\OpenCV2.2MinGW" type "mingw32-make" and hit enter (takes some time)  => took me 10 min...

3.18  Then type "mingw32-make install" and hit enter again 
3.19 Add  "C:\OpenCV2.2MinGW\bin" to your system path


4.  Creating New Project on Eclipse

4.1 Run Eclipse
You can run eclipse by double clicking eclipse.exe or the shortcut you've created.

4.2 Set workspace
It will ask for your workspace location.
I created folder for workspace like this
C:\Documents and Settings\masahiro\My Documents\Eclipse C++
Then Click "OK"

4.3 Start creating new project
If it shows startup menu, click on "Go to Workbench".
Go to File -> New -> C++ Project, then type in your project name "OpenCV2.2 FaceDetection".
Select "Hello World", instead of "Empty Project"... It will creates "src" and "debug" folder automatically, and it helps organizing your project.

4.4 Set Toolchain
Make sure that the "MinGW" is selected in "Toolchains".  If you don't see it there, your MinGW is not installed correctly...
Then click "Next".

4.5 Set project info
Put your name in "Author" and fill in other sections if you want to..., then click on "Next".

4.6 Advanced setting
Next window will let you set your configulation.
Click on "Advanced Setting".

4.7 Add path to includes
Go to "C/C++ Build" -> "Settings" and select "Tool Settings".
Under GCC C++ Compiler folder, look for "Includes" and click on it.
In the "Include paths (-l)", add OpenCV include directory.
Click on "Add" button and select from your "File System".
My OpenCV for MinGW is installed under C:/ and the include directory is "C:\OpenCV2.2MinGW\include".

4.8 Add Libraries
Under MinGW Linker, select "Libraries" and add following files to "Libraries (-l)"
- libopencv_highgui220d
- libopencv_ml220d
- libopencv_core220d
- libopencv_video220d
- libopencv_legacy220d
- libopencv_imgproc220d
- libopencv_objdetect220d
<!> xxxxd.lib is made for debug... for release build, use xxx.lib.  If you do not see xxxd.lib, you may forgot to configure cmake for debug at step 3.13.

4.9 Add Library Path
Add OpenCV Library folder to "Library search path (-L)".
"C:\OpenCV2.2MinGW\lib"

 4.10 Finishing up
Click "Apply", then click "OK". Finally, Click "Finish".

5.  Writing a Code

//=============================================
// Name        : OpenCV2.2 Face Detection.cpp
// Author      : Masahiro
// Version     :
// Copyright   : Open to anyone...
// Description : Face Detection example on OpenCV version 2.2
//=============================================

#include <opencv2/objdetect/objdetect.hpp>
#include <opencv2/highgui/highgui.hpp>
#include <opencv2/imgproc/imgproc.hpp>

#include <stdio.h>
#include <stdlib.h>
#include <iostream>

using namespace std;
using namespace cv;


const String haarcascade_face = "C:/OpenCV2.2/data/haarcascades/haarcascade_frontalface_alt.xml";
const String haarcascade_eye = "C:/OpenCV2.2/data/haarcascades/haarcascade_eye_tree_eyeglasses.xml";

const double scale = 3.0;  //1.0 for 1:1 processing. use bigger number to increase the speed


void detectAndDraw( Mat& img,
                   CascadeClassifier& cascade, CascadeClassifier& nestedCascade,
                   double scale);


int main (){
    CascadeClassifier cascade_face, cascade_eye;

    CvCapture* capture = 0;
    Mat frame, frameCopy, image;

    //load cascade file for face detection
    if(!cascade_face.load(haarcascade_face)){
        cerr << "ERROR: Could not load classifier cascade" << endl;
        return -1;
    }

    //load cascade file for eye detection
    if(!cascade_eye.load(haarcascade_eye)){
        cerr << "ERROR: Could not load classifier cascade" << endl;
        return -1;
    }

    //capture camera image
    capture = cvCaptureFromCAM(0);

    //create window
    cvNamedWindow("result", 1);  //arg2 = 1 for autosize

    //process captured image
    if( capture )
    {
        cout << "In capture ..." << endl;
        for(;;)
        {
            IplImage* iplImg = cvQueryFrame( capture );
            frame = iplImg;
            if( frame.empty() )
                break;
            if( iplImg->origin == IPL_ORIGIN_TL )
                frame.copyTo( frameCopy );
            else
                flip( frame, frameCopy, 0 );

            detectAndDraw( frameCopy, cascade_face, cascade_eye, scale );

            if( waitKey( 10 ) >= 0 )    //wait for 10msec before processing next frame
                                        //if the key entry is detected, it will break from the loop
                goto _cleanup_;
        }

        waitKey(0);
_cleanup_:
        cvReleaseCapture( &capture );
    }

    return 0;
}


void detectAndDraw( Mat& img,
                   CascadeClassifier& cascade, CascadeClassifier& nestedCascade,
                   double scale)
{
    int i = 0;
    double t = 0;
    vector<Rect> faces;
    const static Scalar colors[] =  { CV_RGB(0,0,255),
        CV_RGB(0,128,255),
        CV_RGB(0,255,255),
        CV_RGB(0,255,0),
        CV_RGB(255,128,0),
        CV_RGB(255,255,0),
        CV_RGB(255,0,0),
        CV_RGB(255,0,255)} ;

    Mat gray, smallImg( cvRound (img.rows/scale), cvRound(img.cols/scale), CV_8UC1 );

    cvtColor( img, gray, CV_BGR2GRAY );
    resize( gray, smallImg, smallImg.size(), 0, 0, INTER_LINEAR );
    equalizeHist( smallImg, smallImg );

    t = (double)cvGetTickCount();
    cascade.detectMultiScale( smallImg, faces,
        1.1, 2, 0
        //|CV_HAAR_FIND_BIGGEST_OBJECT
        //|CV_HAAR_DO_ROUGH_SEARCH
        |CV_HAAR_SCALE_IMAGE
        ,
        Size(30, 30) );
    t = (double)cvGetTickCount() - t;

    printf( "detection time = %g ms\n", t/((double)cvGetTickFrequency()*1000.) );


    for( vector<Rect>::const_iterator r = faces.begin(); r != faces.end(); r++, i++ )
    {
        Mat smallImgROI;
        vector<Rect> nestedObjects;
        Point center;
        Scalar color = colors[i%8];
        int radius;
        center.x = cvRound((r->x + r->width*0.5)*scale);
        center.y = cvRound((r->y + r->height*0.5)*scale);
        radius = cvRound((r->width + r->height)*0.25*scale);
        circle( img, center, radius, color, 3, 8, 0 );


        //Commenting eye detection part out to make it faster...
        /*
        //detecting eye
        if( nestedCascade.empty() )
            continue;
        smallImgROI = smallImg(*r);
        nestedCascade.detectMultiScale( smallImgROI, nestedObjects,
            1.1, 2, 0
            //|CV_HAAR_FIND_BIGGEST_OBJECT
            //|CV_HAAR_DO_ROUGH_SEARCH
            //|CV_HAAR_DO_CANNY_PRUNING
            |CV_HAAR_SCALE_IMAGE
            ,
            Size(30, 30) );


        for( vector<Rect>::const_iterator nr = nestedObjects.begin(); nr != nestedObjects.end(); nr++ )
        {
            center.x = cvRound((r->x + nr->x + nr->width*0.5)*scale);
            center.y = cvRound((r->y + nr->y + nr->height*0.5)*scale);
            radius = cvRound((nr->width + nr->height)*0.25*scale);
            circle( img, center, radius, color, 3, 8, 0 );
        }
        */

    }
    cv::imshow( "result", img );
}


Wednesday, April 20, 2011

[KTX-PC] Setting up CPU Preference

Overview
In this section, I will explain how to setup CPU preference for your KTX-PC.
It is a little different from the other KTX robots, please follow the steps below.

<!> Before start working steps below, please read through entire document on this page, to know more about what I'm doing here.


<!> By re-setting up the CPU preference from default setting, it will fix the problem caused by the change you made.  It's really hard to debug the change that causing the problem.  It's a lot easier to just initialize and reset the setting.


<!> If you do not want to calibrate your robot again (if you initialize the board, you have to calibrate it again), or do not want initialize your CPU board, please READ through the steps below and DO the step listed in "Quick Fix" at the bottom of the page.Quick Fix still require Calibration!!!


<!> The CPU preference will not be saved with Robot Project file.  The preference will be saved with the Project, however, the saved file will be updated each time you connect with CPU board.  Therefore, even if you use backup project, the preference will remain the same from the previous change you made, once you establish the connection.  I will explain a trick to save your preference and load it before RM2 update the preference from the CPU board.


<!> Do NOT apply power to the servo, until you finish calibrating the servo motors.  If you initialize the CPU board, it will lose all the calibrated positions.  Therefore, you have to do calibration again before using your robot for development.


1.  Reset CPU Board
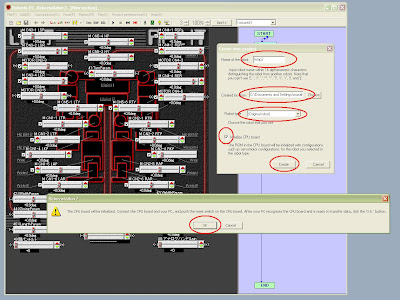
By initializing the CPU board for "Original Robot",
it will set all the CPU preference back to default.

It will initialize CPU board, and changes all the preference back to factory default.
Press "OK" if it asks...
We just need this project file for initializing CPU board, once it initializes, close the RM2 and delete the entire folder you just created.
 <!>  Do not Apply power!!!  


2.  Open Robot Project
Open your "existing" Robot Project, the one you are currently using...
As I said..., Robot Project does not contain (It contains, but not loaded by RM2) CPU preference.  Therefore, the setting remains the same as the setting you just initialized as "original robot".

Connect CPU board.
It will ask for loading appropriate project, select "NO".
 
3.  Change CPU Preference

Go to Project Preference -> CPU preference -> Preferences of CPU board.
Change following:


  • Activation Timer:  -1
  • Serial Setting:  CN7, Command
Click on "Apply" and select "OK".
     Go to Servomotor Output, and change following settings:
    • CN1-5(04)
           300 31 133
    • CN1-6(05)
           200 32 132
    • CN2-5(10)
           -300 31 133
    • CN2-6(11)
           200 32 132
    • CN5-1(24)
           256 41 244
    • CN5-6(29)
           -256 41 244
    • CN5-3(26)
           15000 49 246
           5600 49 78
    • CN5-4(27)
           -15000 49 247
           5600 49 79 
     Click on "Apply" and select "OK". 
    Go to Expansion Board Preference and add Gyro/Accel Sensor board.
    Click on "Apply".  If your board is connected correctly, it will show you the sampling values.
    Change "offset" and click "Apply", It will adjust the sampling value.  Please adjust the sampling value close to Zero at standing straight position (You can set this at shitting down straight position, too. Make sure your upper body is straight up).

    Once you finish it, click on"Apply" and apply changes you made.
    You will see some dialog box, just click "OK".

    4.  Upload the change to CPU Board
     It might ask for the missing audio file, just click "OK".  I will fix that later...
    (Or you can fix this by yourself, go to each motion file that has audio files in and change the track number to zero.)
     Once it finish loading, cklick "OK" and and close the transfer window.


    5.  Backup the CPU Preference
    Go to your Project directory and look for the file, "medit_rom.ini".  Copy and paste the file, and change the name to "medit_rom_backup.ini".


    6.  Loading Preference from Backup
    Close RM2 if you have it opened.

    Go to your Project directory, and delete your current "medit_rom.ini".   Copy and paste "medit_rom_backup.ini" and change the name to "medit_rom.ini".
    Then, Click on robot project file and start RM2.
     Now, Click on transfer button without establishing connection, and write preference to the CPU board.
     Trick is "Without Establish Connection"...
    Once you have connection, RM2 automatically loads CPU preference from CPU board and updates "medit_rom.ini".  By transfering your backup preference without establishing connection, you can prevent this automated updates of CPU preference.

    7.  Calibrate the robot
    Please follow the steps for the calibration in this page.


    Quick Fix!
    You might notice this quick fix at step 6...
    Yes, you don't have to follow above steps to fix your problem on CPU preference...
    You can download the original "medit_rom.ini" file from here >> and use this file as your backup and do step 6 and 7.
    Wow, easy...

    Monday, April 18, 2011

    [Programming] OpenCV2.2 Face Detection Example for VC++ 2010 Express

    If you are having trouble setting up VC++2010 Express for your face detection software, using opencv2.2.
    Please download my project file here and add it to your solution.
    Or create your own by going over my review here...

    Setting up OpenCV Ver2.2 for FaceDetection

    1.  Installing Opencv2.2
    Please download and install OpenCV2.2 from here >>
    I used the file says "OpenCV-2.2.0-win32-vs2010.exe ", which is windows installer...
    Some of the software that use OpenCV require System pass, please mark the check box if it asks.

    2.  Installing VC++ 2010 Express
    If you do not have it, install it from here >>


    3.  Create Empty project 
    Start VC++ and go to "File" -> "New" -> "Project" ->  "VisualC++" -> "General" -> "Empty Project".
    Enter a project name, "Test_HelloWorld", and solution name "OpenCV2.2 Examples".
    and Click OK.

    4.  Configure the Project
    Right Click on Project which you created, and select "Property".

    Please go to the installation guide here and read...
    Do following steps as described in the guide
    1. Add 2 new Include Directories (it's the path where you installed OpenCV, include folder):
      • C:\Program Files\OpenCV2.2\include
      • C:\Program Files\OpenCV2.2\include\opencv
    2. Add 1 new Library Directory (it's the path where you installed OpenCV, lib folder):
      • C:\Program Files\OpenCV2.2\lib
    3. Go to Linker in the left menu and select Input option
    4. Add these entries on Additional Dependencies option:
      • C:\Program Files\OpenCV2.2\lib\opencv_core220d.lib
      • C:\Program Files\OpenCV2.2\lib\opencv_highgui220d.lib
      • C:\Program Files\OpenCV2.2\lib\opencv_video220d.lib
      • C:\Program Files\OpenCV2.2\lib\opencv_ml220d.lib
      • C:\Program Files\OpenCV2.2\lib\opencv_legacy220d.lib
      • C:\Program Files\OpenCV2.2\lib\opencv_imgproc220d.lib 
      • C:\Program Files\OpenCV2.2\lib\opencv_objdetect220d.lib (optional..., not listed in the guide, but required for face detect sample)
    <!> The path to the OpenCV directory depends on your system and how you installed.  For my machine, it was installed under "C:\" instead of "Program Files".
    <!> For Additional Dependency you can just type in the name of the files.
    5.  Writing a Code
    Create and add "main.cpp".
    The code below is the modified version of "facedetect.cpp" in the sample on OpenCV

    //Header file has been changed from v2.1
    #include <opencv2/objdetect/objdetect.hpp>
    #include <opencv2/highgui/highgui.hpp>
    #include <opencv2/imgproc/imgproc.hpp>

    #include <iostream>

    using namespace std;
    using namespace cv;

    //change the path to the your haar file
    const String haarcascade_face = "../Haarcascades/haarcascade_frontalface_alt.xml";
    const String haarcascade_eye = "../Haarcascades/haarcascade_eye_tree_eyeglasses.xml";

    //1.0 for 1:1 processing. use bigger number to increase the speed
    //used as =>   smallImg( cvRound (img.rows/scale), cvRound(img.cols/scale), CV_8UC1 );
    const double scale = 3.0;

    void detectAndDraw( Mat& img,
                       CascadeClassifier& cascade, CascadeClassifier& nestedCascade,
                       double scale);

    void main (){
           
        CascadeClassifier cascade_face, cascade_eye;

        CvCapture* capture = 0;
        Mat frame, frameCopy, image;

        //load cascade file for face detection
        //If the load function returns false, set a break point before this call 
        //and see the contents inside "haarcascade_face".  
        //If it loading the contents of Haar cascade, but returning false, then check your additional dependency. 
        //If you are running under "debug", you have to use xxxxd.lib instead of xxxx.lib.
        if(!cascade_face.load(haarcascade_face)){
            cerr << "ERROR: Could not load classifier cascade" << endl;
            return;
        }   

        //load cascade file for eye detection
        if(!cascade_eye.load(haarcascade_eye)){
            cerr << "ERROR: Could not load classifier cascade" << endl;
            return;
        }
       
        //capture camera image
        capture = cvCaptureFromCAM(0);

        //create window
        cvNamedWindow("result", 1);  //arg2 = 1 for autosize

        //process captured image
        if( capture )
        {
            cout << "In capture ..." << endl;
            for(;;)
            {
                IplImage* iplImg = cvQueryFrame( capture );
                frame = iplImg;
                if( frame.empty() )
                    break;
                if( iplImg->origin == IPL_ORIGIN_TL )
                    frame.copyTo( frameCopy );
                else
                    flip( frame, frameCopy, 0 );

                detectAndDraw( frameCopy, cascade_face, cascade_eye, scale );
                //Don't know why it needs wait call, but it always here...
                if( waitKey( 10 ) >= 0 )    //wait for 10msec before processing next frame
                                            //if the key entry is detected, it will break from the loop
                    goto _cleanup_;
            }

            waitKey(0);
    _cleanup_:
        //Do not forget release memory    
        cvReleaseCapture( &capture );
        }
    }


    void detectAndDraw( Mat& img,
                       CascadeClassifier& cascade, CascadeClassifier& nestedCascade,
                       double scale)
    {
        int i = 0;
        double t = 0;
        vector<Rect> faces;
        const static Scalar colors[] =  { CV_RGB(0,0,255),
            CV_RGB(0,128,255),
            CV_RGB(0,255,255),
            CV_RGB(0,255,0),
            CV_RGB(255,128,0),
            CV_RGB(255,255,0),
            CV_RGB(255,0,0),
            CV_RGB(255,0,255)} ;

        Mat gray, smallImg( cvRound (img.rows/scale), cvRound(img.cols/scale), CV_8UC1 );

        cvtColor( img, gray, CV_BGR2GRAY );
        resize( gray, smallImg, smallImg.size(), 0, 0, INTER_LINEAR );
        equalizeHist( smallImg, smallImg );

        t = (double)cvGetTickCount();
        cascade.detectMultiScale( smallImg, faces,
            1.1, 2, 0
            //|CV_HAAR_FIND_BIGGEST_OBJECT
            //|CV_HAAR_DO_ROUGH_SEARCH
            |CV_HAAR_SCALE_IMAGE
            ,
            Size(30, 30) );
        t = (double)cvGetTickCount() - t;
       
        printf( "detection time = %g ms\n", t/((double)cvGetTickFrequency()*1000.) );

        //Draw Circle on the output image
        for( vector<Rect>::const_iterator r = faces.begin(); r != faces.end(); r++, i++ )
        {
            Mat smallImgROI;
            vector<Rect> nestedObjects;
            Point center;
            Scalar color = colors[i%8];
            int radius;
            center.x = cvRound((r->x + r->width*0.5)*scale);
            center.y = cvRound((r->y + r->height*0.5)*scale);
            radius = cvRound((r->width + r->height)*0.25*scale);
            circle( img, center, radius, color, 3, 8, 0 );            
             /*  Commenting eye detection part out to make it faster...
            //detecting eye
            if( nestedCascade.empty() )
                continue;
            smallImgROI = smallImg(*r);
            nestedCascade.detectMultiScale( smallImgROI, nestedObjects,
                1.1, 2, 0
                //|CV_HAAR_FIND_BIGGEST_OBJECT
                //|CV_HAAR_DO_ROUGH_SEARCH
                //|CV_HAAR_DO_CANNY_PRUNING
                |CV_HAAR_SCALE_IMAGE
                ,
                Size(30, 30) );
           

            for( vector<Rect>::const_iterator nr = nestedObjects.begin(); nr != nestedObjects.end(); nr++ )
            {
                center.x = cvRound((r->x + nr->x + nr->width*0.5)*scale);
                center.y = cvRound((r->y + nr->y + nr->height*0.5)*scale);
                radius = cvRound((nr->width + nr->height)*0.25*scale);
                circle( img, center, radius, color, 3, 8, 0 );
            }
            */
        } 
        cv::imshow( "result", img );   
    }


    6.  Build and Run the Project
    Just build and run the project as you do on regular C++ project...


    Trouble Shooting.....
    • Program fails to build... -> Linker error... First check to see if all the required library is included or not.
    • Program compiles and runs but breaks at fanction call to OpenCV faunctions -> library specified in Additional dependency is wrong... xxxxxd.lib for debug, and xxxxx.lib for release... if you are building the project under debug mode, you have to use library that the name ends with "d".
    • CV functions return error result eaven if it's getting correct input (result) -> same as above....
    • "Cannot find or open the PDB file" -> Change Setting for debug -> option -> symbol ... Google it... For win7, you need to run as administrator.
    • Nothing happens -> check the path to the Haar Cascade files.