Thursday, September 5, 2013

[KTX] Installing Remote Controller

It's really getting hard to find PS2 remote controllers new/used...
When you buy our KTX robots from us, make sure you get the remote also!

Here is the new version of KTX remote controller, VS-C3.

The remote controller for one of our demo KTX is getting old and having problem with the analog stick...
Let's replace with new VS-C3!

1.  Remove 4 screws and take the front body panel off.

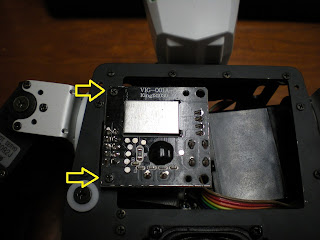
2.  Remove 2 screws and take the old receiver out.


3.  Connect new receiver.

4.  Place the AAA batteries inside remote controller and turn on the remote controller.


5.  Place battery inside the robot and turn on the robot, then press the button switch on the receiver.

6.  The red and green LEDs should start blinking faster.  Press the "analog" button once on the remote controller.
7.  If the remote controller is paired ok, The LEDs should stop blinking and stay turned on.

8.  Place the receiver and screw it on.


Monday, July 1, 2013

[VS-RC003] Analog Board IX-008

Here are some useful information on IX-008.

<Setting up IX008>
1. Settings on the Dip Switch
    1, 2, 3 => OFF, 4 => ON  (it will set the address 0x92 to the board for I2C communication)
2. Settings on the Jumper Pin
    Short 1 and 2 => 5V from CN2-9, Short 2 and 3 => 3.3V from CN2-9
3. Pin Configuration on CN2 Analog IN
    CN2-1:  CH0
    CN2-2:  CH1
    CN2-3:  CH2
    CN2-4:  CH3
    …
    CN2-8:  CH7
    CN2-9:  Power (5V or 3.3V set by the JP1)
    CN2-10 GND

<Setting up Vsrc003 from RM2>
1. Add the analog board from “CPU Preference”.
2. Go to Advanced Settings
3. Change “Data input variable” to “0” for none used channels
4.  “Apply” the settings and transfer the updated CPU preference to VSRC003

Tuesday, April 30, 2013

[KTX] First time using RobovieMaker2

This Post is for the KTX Users who received KTX pre-assembled.
Please have your RobovieMaker2 manual ready in case you need more information.
http://www.kumotek.com/download/manual/RM2manual2_eng.pdf

Once you have had fun with your robot, you would wonder how you can change the animations on those robots.  well, it's pretty simple using our software called RobovieMaker2.
Here is a little tips to get you easy start!

When you start RobovieMaker2 for the first time, it will not be able to locate your robot project file.
Just create one from the scratch!
Please make sure that you are selecting correct robot model.
Also, do NOT connect your robot yet, and do NOT check "initialize CPU board".

Click "Create", and now you have a new robot project file.
Let's connect your robot now!
Connect usb cable and click on connection button on RM2.

When you connect your KTX humanoid robot to RobovieMaker2, it will shows a dialogue box asking for "creating new project".
Normally you can select your robot project that you've been using for the robot...
Since the robot does not come with the original Robot Project file, you cannot chose that option.

Just select "No" on the dialogue.
It will establish connection and load all the CPU configuration from the robot (Vsrc003), without flashing the memory.

Now, click on the transfer button.
Transfer window "Mode switching and adjusting..." will show up.
Click on the transfer button "Transfer the preferences to CPU board".
This will load all the settings to the CPU board, your robot now has the same name as specified in your project file.

Wow, now you have your robot project file ready for your programming!