Wednesday, April 27, 2011

[Programming] OpenCV2.2 on EclipseIDE C++ Face Detection Example

Overview
I will demonstrate how to create OpenCV projects on Eclipse IDE for C++.

Goal here is to create Face tracking example using Eclipse IDE!!!
I will follow the information on this page>> written by
It is written for OpenCV2.0, so the instruction should apply to the OpenCV2.2 also...

1.  Install MinGW
You can download "Automated MinGW Installer from this page>>.
If you have older version installed, uninstall it and delete all the contents inside your C:/MinGW folder.
The one I'm using in this demo is "mingw-get-inst-20110316.exe".
When the installer asks for components to install, I selected select...
 - C++ compiler
 - ObjC Compiler
 - MinGW Developer ToolKit
Select whatever you think you would need for your further development.
I think, we just need C++ compiler for this demonstration ...
<!> After the installation, check your system path to see if "C:\MinGW\bin" is included or not...
On my machine, even if I marked the checkbox for adding path to system during the installation, it did not add the path... So, I did it manually.
Here is a link to the page explains how to add the path...
Do not forget restarting your PC!!!

2.  Install Eclipse
You can download Eclipse IDE from this page >>.
The version I'm using is "eclipse-cpp-helios-SR2-win32.zip".
After finish downloading, extract it to the place that you want...
I placed eclipse folder like this =>  C:\eclipse-cpp-helios-SR2-win32\eclipse\eclipse.exe
Create shortcut of eclipse.exe and place it on your desktop.

3.  Install OpenCV 2.2
OpenCV2.2 does not support MinGW by default... you have to create it by yourself.

I used this page as a reference...It is written for a Code Block...

3.1  Install Cmake
You will need "Cmake" to build your OpenCV for MinGW...
You can download it from this page>>.

3.2  Download and Extract OpenCV2.2-win.zip
Download "OpenCV-2.2.0-win.zip" from this page.
Extract the file under "C:/" (this can be anywhere... but if you have a " "(space) in your path, you will get error later...).
I extracted into "C:\OpenCV-2.2.0-win\OpenCV-2.2.0".

3.3  Run Cmake (cmake-gui)
3.4  Set  the source code "C:\OpenCV-2.2.0-win\OpenCV-2.2.0"
3.5  Set where to build the binaries e.g. "C:\OpenCV2.2MinGW"
3.6  Press Configure
3.7  Let Cmake create the new folder
3.8  Specify the generator "Eclipse CDT 4 - MinGW Makefiles". 
3.9  Select "Specify native compilers" and click next
3.10  For C, set "C:/MinGW/bin/gcc.exe".
3.11  For C++, set "C:/MinGW/bin/g++.exe".

3.12  Click Finish
<!> If your MinGW/bin is not added to your system path, it will generate a error says missing dll

3.13  In the configulation screen
Look for "CMAKE_BUILD_TYPE" and type in "DEBUG" or "Release".
Select Build Examples if you want...

3.14  Click Configure Again
3.15  Click generate
3.16  Close cmake

3.17  Make OpenCV
Go to the command prompt and inside the folder "C:\OpenCV2.2MinGW" type "mingw32-make" and hit enter (takes some time)  => took me 10 min...

3.18  Then type "mingw32-make install" and hit enter again 
3.19 Add  "C:\OpenCV2.2MinGW\bin" to your system path


4.  Creating New Project on Eclipse

4.1 Run Eclipse
You can run eclipse by double clicking eclipse.exe or the shortcut you've created.

4.2 Set workspace
It will ask for your workspace location.
I created folder for workspace like this
C:\Documents and Settings\masahiro\My Documents\Eclipse C++
Then Click "OK"

4.3 Start creating new project
If it shows startup menu, click on "Go to Workbench".
Go to File -> New -> C++ Project, then type in your project name "OpenCV2.2 FaceDetection".
Select "Hello World", instead of "Empty Project"... It will creates "src" and "debug" folder automatically, and it helps organizing your project.

4.4 Set Toolchain
Make sure that the "MinGW" is selected in "Toolchains".  If you don't see it there, your MinGW is not installed correctly...
Then click "Next".

4.5 Set project info
Put your name in "Author" and fill in other sections if you want to..., then click on "Next".

4.6 Advanced setting
Next window will let you set your configulation.
Click on "Advanced Setting".

4.7 Add path to includes
Go to "C/C++ Build" -> "Settings" and select "Tool Settings".
Under GCC C++ Compiler folder, look for "Includes" and click on it.
In the "Include paths (-l)", add OpenCV include directory.
Click on "Add" button and select from your "File System".
My OpenCV for MinGW is installed under C:/ and the include directory is "C:\OpenCV2.2MinGW\include".

4.8 Add Libraries
Under MinGW Linker, select "Libraries" and add following files to "Libraries (-l)"
- libopencv_highgui220d
- libopencv_ml220d
- libopencv_core220d
- libopencv_video220d
- libopencv_legacy220d
- libopencv_imgproc220d
- libopencv_objdetect220d
<!> xxxxd.lib is made for debug... for release build, use xxx.lib.  If you do not see xxxd.lib, you may forgot to configure cmake for debug at step 3.13.

4.9 Add Library Path
Add OpenCV Library folder to "Library search path (-L)".
"C:\OpenCV2.2MinGW\lib"

 4.10 Finishing up
Click "Apply", then click "OK". Finally, Click "Finish".

5.  Writing a Code

//=============================================
// Name        : OpenCV2.2 Face Detection.cpp
// Author      : Masahiro
// Version     :
// Copyright   : Open to anyone...
// Description : Face Detection example on OpenCV version 2.2
//=============================================

#include <opencv2/objdetect/objdetect.hpp>
#include <opencv2/highgui/highgui.hpp>
#include <opencv2/imgproc/imgproc.hpp>

#include <stdio.h>
#include <stdlib.h>
#include <iostream>

using namespace std;
using namespace cv;


const String haarcascade_face = "C:/OpenCV2.2/data/haarcascades/haarcascade_frontalface_alt.xml";
const String haarcascade_eye = "C:/OpenCV2.2/data/haarcascades/haarcascade_eye_tree_eyeglasses.xml";

const double scale = 3.0;  //1.0 for 1:1 processing. use bigger number to increase the speed


void detectAndDraw( Mat& img,
                   CascadeClassifier& cascade, CascadeClassifier& nestedCascade,
                   double scale);


int main (){
    CascadeClassifier cascade_face, cascade_eye;

    CvCapture* capture = 0;
    Mat frame, frameCopy, image;

    //load cascade file for face detection
    if(!cascade_face.load(haarcascade_face)){
        cerr << "ERROR: Could not load classifier cascade" << endl;
        return -1;
    }

    //load cascade file for eye detection
    if(!cascade_eye.load(haarcascade_eye)){
        cerr << "ERROR: Could not load classifier cascade" << endl;
        return -1;
    }

    //capture camera image
    capture = cvCaptureFromCAM(0);

    //create window
    cvNamedWindow("result", 1);  //arg2 = 1 for autosize

    //process captured image
    if( capture )
    {
        cout << "In capture ..." << endl;
        for(;;)
        {
            IplImage* iplImg = cvQueryFrame( capture );
            frame = iplImg;
            if( frame.empty() )
                break;
            if( iplImg->origin == IPL_ORIGIN_TL )
                frame.copyTo( frameCopy );
            else
                flip( frame, frameCopy, 0 );

            detectAndDraw( frameCopy, cascade_face, cascade_eye, scale );

            if( waitKey( 10 ) >= 0 )    //wait for 10msec before processing next frame
                                        //if the key entry is detected, it will break from the loop
                goto _cleanup_;
        }

        waitKey(0);
_cleanup_:
        cvReleaseCapture( &capture );
    }

    return 0;
}


void detectAndDraw( Mat& img,
                   CascadeClassifier& cascade, CascadeClassifier& nestedCascade,
                   double scale)
{
    int i = 0;
    double t = 0;
    vector<Rect> faces;
    const static Scalar colors[] =  { CV_RGB(0,0,255),
        CV_RGB(0,128,255),
        CV_RGB(0,255,255),
        CV_RGB(0,255,0),
        CV_RGB(255,128,0),
        CV_RGB(255,255,0),
        CV_RGB(255,0,0),
        CV_RGB(255,0,255)} ;

    Mat gray, smallImg( cvRound (img.rows/scale), cvRound(img.cols/scale), CV_8UC1 );

    cvtColor( img, gray, CV_BGR2GRAY );
    resize( gray, smallImg, smallImg.size(), 0, 0, INTER_LINEAR );
    equalizeHist( smallImg, smallImg );

    t = (double)cvGetTickCount();
    cascade.detectMultiScale( smallImg, faces,
        1.1, 2, 0
        //|CV_HAAR_FIND_BIGGEST_OBJECT
        //|CV_HAAR_DO_ROUGH_SEARCH
        |CV_HAAR_SCALE_IMAGE
        ,
        Size(30, 30) );
    t = (double)cvGetTickCount() - t;

    printf( "detection time = %g ms\n", t/((double)cvGetTickFrequency()*1000.) );


    for( vector<Rect>::const_iterator r = faces.begin(); r != faces.end(); r++, i++ )
    {
        Mat smallImgROI;
        vector<Rect> nestedObjects;
        Point center;
        Scalar color = colors[i%8];
        int radius;
        center.x = cvRound((r->x + r->width*0.5)*scale);
        center.y = cvRound((r->y + r->height*0.5)*scale);
        radius = cvRound((r->width + r->height)*0.25*scale);
        circle( img, center, radius, color, 3, 8, 0 );


        //Commenting eye detection part out to make it faster...
        /*
        //detecting eye
        if( nestedCascade.empty() )
            continue;
        smallImgROI = smallImg(*r);
        nestedCascade.detectMultiScale( smallImgROI, nestedObjects,
            1.1, 2, 0
            //|CV_HAAR_FIND_BIGGEST_OBJECT
            //|CV_HAAR_DO_ROUGH_SEARCH
            //|CV_HAAR_DO_CANNY_PRUNING
            |CV_HAAR_SCALE_IMAGE
            ,
            Size(30, 30) );


        for( vector<Rect>::const_iterator nr = nestedObjects.begin(); nr != nestedObjects.end(); nr++ )
        {
            center.x = cvRound((r->x + nr->x + nr->width*0.5)*scale);
            center.y = cvRound((r->y + nr->y + nr->height*0.5)*scale);
            radius = cvRound((nr->width + nr->height)*0.25*scale);
            circle( img, center, radius, color, 3, 8, 0 );
        }
        */

    }
    cv::imshow( "result", img );
}


Wednesday, April 20, 2011

[KTX-PC] Setting up CPU Preference

Overview
In this section, I will explain how to setup CPU preference for your KTX-PC.
It is a little different from the other KTX robots, please follow the steps below.

<!> Before start working steps below, please read through entire document on this page, to know more about what I'm doing here.


<!> By re-setting up the CPU preference from default setting, it will fix the problem caused by the change you made.  It's really hard to debug the change that causing the problem.  It's a lot easier to just initialize and reset the setting.


<!> If you do not want to calibrate your robot again (if you initialize the board, you have to calibrate it again), or do not want initialize your CPU board, please READ through the steps below and DO the step listed in "Quick Fix" at the bottom of the page.Quick Fix still require Calibration!!!


<!> The CPU preference will not be saved with Robot Project file.  The preference will be saved with the Project, however, the saved file will be updated each time you connect with CPU board.  Therefore, even if you use backup project, the preference will remain the same from the previous change you made, once you establish the connection.  I will explain a trick to save your preference and load it before RM2 update the preference from the CPU board.


<!> Do NOT apply power to the servo, until you finish calibrating the servo motors.  If you initialize the CPU board, it will lose all the calibrated positions.  Therefore, you have to do calibration again before using your robot for development.


1.  Reset CPU Board
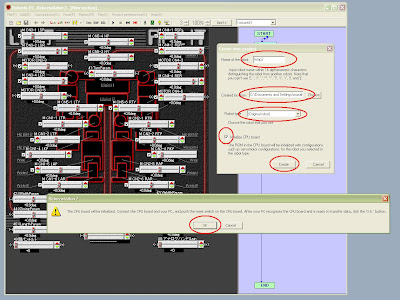
By initializing the CPU board for "Original Robot",
it will set all the CPU preference back to default.

It will initialize CPU board, and changes all the preference back to factory default.
Press "OK" if it asks...
We just need this project file for initializing CPU board, once it initializes, close the RM2 and delete the entire folder you just created.
 <!>  Do not Apply power!!!  


2.  Open Robot Project
Open your "existing" Robot Project, the one you are currently using...
As I said..., Robot Project does not contain (It contains, but not loaded by RM2) CPU preference.  Therefore, the setting remains the same as the setting you just initialized as "original robot".

Connect CPU board.
It will ask for loading appropriate project, select "NO".
 
3.  Change CPU Preference

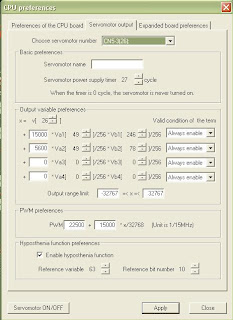
Go to Project Preference -> CPU preference -> Preferences of CPU board.
Change following:


  • Activation Timer:  -1
  • Serial Setting:  CN7, Command
Click on "Apply" and select "OK".
     Go to Servomotor Output, and change following settings:
    • CN1-5(04)
           300 31 133
    • CN1-6(05)
           200 32 132
    • CN2-5(10)
           -300 31 133
    • CN2-6(11)
           200 32 132
    • CN5-1(24)
           256 41 244
    • CN5-6(29)
           -256 41 244
    • CN5-3(26)
           15000 49 246
           5600 49 78
    • CN5-4(27)
           -15000 49 247
           5600 49 79 
     Click on "Apply" and select "OK". 
    Go to Expansion Board Preference and add Gyro/Accel Sensor board.
    Click on "Apply".  If your board is connected correctly, it will show you the sampling values.
    Change "offset" and click "Apply", It will adjust the sampling value.  Please adjust the sampling value close to Zero at standing straight position (You can set this at shitting down straight position, too. Make sure your upper body is straight up).

    Once you finish it, click on"Apply" and apply changes you made.
    You will see some dialog box, just click "OK".

    4.  Upload the change to CPU Board
     It might ask for the missing audio file, just click "OK".  I will fix that later...
    (Or you can fix this by yourself, go to each motion file that has audio files in and change the track number to zero.)
     Once it finish loading, cklick "OK" and and close the transfer window.


    5.  Backup the CPU Preference
    Go to your Project directory and look for the file, "medit_rom.ini".  Copy and paste the file, and change the name to "medit_rom_backup.ini".


    6.  Loading Preference from Backup
    Close RM2 if you have it opened.

    Go to your Project directory, and delete your current "medit_rom.ini".   Copy and paste "medit_rom_backup.ini" and change the name to "medit_rom.ini".
    Then, Click on robot project file and start RM2.
     Now, Click on transfer button without establishing connection, and write preference to the CPU board.
     Trick is "Without Establish Connection"...
    Once you have connection, RM2 automatically loads CPU preference from CPU board and updates "medit_rom.ini".  By transfering your backup preference without establishing connection, you can prevent this automated updates of CPU preference.

    7.  Calibrate the robot
    Please follow the steps for the calibration in this page.


    Quick Fix!
    You might notice this quick fix at step 6...
    Yes, you don't have to follow above steps to fix your problem on CPU preference...
    You can download the original "medit_rom.ini" file from here >> and use this file as your backup and do step 6 and 7.
    Wow, easy...

    Monday, April 18, 2011

    [Programming] OpenCV2.2 Face Detection Example for VC++ 2010 Express

    If you are having trouble setting up VC++2010 Express for your face detection software, using opencv2.2.
    Please download my project file here and add it to your solution.
    Or create your own by going over my review here...

    Setting up OpenCV Ver2.2 for FaceDetection

    1.  Installing Opencv2.2
    Please download and install OpenCV2.2 from here >>
    I used the file says "OpenCV-2.2.0-win32-vs2010.exe ", which is windows installer...
    Some of the software that use OpenCV require System pass, please mark the check box if it asks.

    2.  Installing VC++ 2010 Express
    If you do not have it, install it from here >>


    3.  Create Empty project 
    Start VC++ and go to "File" -> "New" -> "Project" ->  "VisualC++" -> "General" -> "Empty Project".
    Enter a project name, "Test_HelloWorld", and solution name "OpenCV2.2 Examples".
    and Click OK.

    4.  Configure the Project
    Right Click on Project which you created, and select "Property".

    Please go to the installation guide here and read...
    Do following steps as described in the guide
    1. Add 2 new Include Directories (it's the path where you installed OpenCV, include folder):
      • C:\Program Files\OpenCV2.2\include
      • C:\Program Files\OpenCV2.2\include\opencv
    2. Add 1 new Library Directory (it's the path where you installed OpenCV, lib folder):
      • C:\Program Files\OpenCV2.2\lib
    3. Go to Linker in the left menu and select Input option
    4. Add these entries on Additional Dependencies option:
      • C:\Program Files\OpenCV2.2\lib\opencv_core220d.lib
      • C:\Program Files\OpenCV2.2\lib\opencv_highgui220d.lib
      • C:\Program Files\OpenCV2.2\lib\opencv_video220d.lib
      • C:\Program Files\OpenCV2.2\lib\opencv_ml220d.lib
      • C:\Program Files\OpenCV2.2\lib\opencv_legacy220d.lib
      • C:\Program Files\OpenCV2.2\lib\opencv_imgproc220d.lib 
      • C:\Program Files\OpenCV2.2\lib\opencv_objdetect220d.lib (optional..., not listed in the guide, but required for face detect sample)
    <!> The path to the OpenCV directory depends on your system and how you installed.  For my machine, it was installed under "C:\" instead of "Program Files".
    <!> For Additional Dependency you can just type in the name of the files.
    5.  Writing a Code
    Create and add "main.cpp".
    The code below is the modified version of "facedetect.cpp" in the sample on OpenCV

    //Header file has been changed from v2.1
    #include <opencv2/objdetect/objdetect.hpp>
    #include <opencv2/highgui/highgui.hpp>
    #include <opencv2/imgproc/imgproc.hpp>

    #include <iostream>

    using namespace std;
    using namespace cv;

    //change the path to the your haar file
    const String haarcascade_face = "../Haarcascades/haarcascade_frontalface_alt.xml";
    const String haarcascade_eye = "../Haarcascades/haarcascade_eye_tree_eyeglasses.xml";

    //1.0 for 1:1 processing. use bigger number to increase the speed
    //used as =>   smallImg( cvRound (img.rows/scale), cvRound(img.cols/scale), CV_8UC1 );
    const double scale = 3.0;

    void detectAndDraw( Mat& img,
                       CascadeClassifier& cascade, CascadeClassifier& nestedCascade,
                       double scale);

    void main (){
           
        CascadeClassifier cascade_face, cascade_eye;

        CvCapture* capture = 0;
        Mat frame, frameCopy, image;

        //load cascade file for face detection
        //If the load function returns false, set a break point before this call 
        //and see the contents inside "haarcascade_face".  
        //If it loading the contents of Haar cascade, but returning false, then check your additional dependency. 
        //If you are running under "debug", you have to use xxxxd.lib instead of xxxx.lib.
        if(!cascade_face.load(haarcascade_face)){
            cerr << "ERROR: Could not load classifier cascade" << endl;
            return;
        }   

        //load cascade file for eye detection
        if(!cascade_eye.load(haarcascade_eye)){
            cerr << "ERROR: Could not load classifier cascade" << endl;
            return;
        }
       
        //capture camera image
        capture = cvCaptureFromCAM(0);

        //create window
        cvNamedWindow("result", 1);  //arg2 = 1 for autosize

        //process captured image
        if( capture )
        {
            cout << "In capture ..." << endl;
            for(;;)
            {
                IplImage* iplImg = cvQueryFrame( capture );
                frame = iplImg;
                if( frame.empty() )
                    break;
                if( iplImg->origin == IPL_ORIGIN_TL )
                    frame.copyTo( frameCopy );
                else
                    flip( frame, frameCopy, 0 );

                detectAndDraw( frameCopy, cascade_face, cascade_eye, scale );
                //Don't know why it needs wait call, but it always here...
                if( waitKey( 10 ) >= 0 )    //wait for 10msec before processing next frame
                                            //if the key entry is detected, it will break from the loop
                    goto _cleanup_;
            }

            waitKey(0);
    _cleanup_:
        //Do not forget release memory    
        cvReleaseCapture( &capture );
        }
    }


    void detectAndDraw( Mat& img,
                       CascadeClassifier& cascade, CascadeClassifier& nestedCascade,
                       double scale)
    {
        int i = 0;
        double t = 0;
        vector<Rect> faces;
        const static Scalar colors[] =  { CV_RGB(0,0,255),
            CV_RGB(0,128,255),
            CV_RGB(0,255,255),
            CV_RGB(0,255,0),
            CV_RGB(255,128,0),
            CV_RGB(255,255,0),
            CV_RGB(255,0,0),
            CV_RGB(255,0,255)} ;

        Mat gray, smallImg( cvRound (img.rows/scale), cvRound(img.cols/scale), CV_8UC1 );

        cvtColor( img, gray, CV_BGR2GRAY );
        resize( gray, smallImg, smallImg.size(), 0, 0, INTER_LINEAR );
        equalizeHist( smallImg, smallImg );

        t = (double)cvGetTickCount();
        cascade.detectMultiScale( smallImg, faces,
            1.1, 2, 0
            //|CV_HAAR_FIND_BIGGEST_OBJECT
            //|CV_HAAR_DO_ROUGH_SEARCH
            |CV_HAAR_SCALE_IMAGE
            ,
            Size(30, 30) );
        t = (double)cvGetTickCount() - t;
       
        printf( "detection time = %g ms\n", t/((double)cvGetTickFrequency()*1000.) );

        //Draw Circle on the output image
        for( vector<Rect>::const_iterator r = faces.begin(); r != faces.end(); r++, i++ )
        {
            Mat smallImgROI;
            vector<Rect> nestedObjects;
            Point center;
            Scalar color = colors[i%8];
            int radius;
            center.x = cvRound((r->x + r->width*0.5)*scale);
            center.y = cvRound((r->y + r->height*0.5)*scale);
            radius = cvRound((r->width + r->height)*0.25*scale);
            circle( img, center, radius, color, 3, 8, 0 );            
             /*  Commenting eye detection part out to make it faster...
            //detecting eye
            if( nestedCascade.empty() )
                continue;
            smallImgROI = smallImg(*r);
            nestedCascade.detectMultiScale( smallImgROI, nestedObjects,
                1.1, 2, 0
                //|CV_HAAR_FIND_BIGGEST_OBJECT
                //|CV_HAAR_DO_ROUGH_SEARCH
                //|CV_HAAR_DO_CANNY_PRUNING
                |CV_HAAR_SCALE_IMAGE
                ,
                Size(30, 30) );
           

            for( vector<Rect>::const_iterator nr = nestedObjects.begin(); nr != nestedObjects.end(); nr++ )
            {
                center.x = cvRound((r->x + nr->x + nr->width*0.5)*scale);
                center.y = cvRound((r->y + nr->y + nr->height*0.5)*scale);
                radius = cvRound((nr->width + nr->height)*0.25*scale);
                circle( img, center, radius, color, 3, 8, 0 );
            }
            */
        } 
        cv::imshow( "result", img );   
    }


    6.  Build and Run the Project
    Just build and run the project as you do on regular C++ project...


    Trouble Shooting.....
    • Program fails to build... -> Linker error... First check to see if all the required library is included or not.
    • Program compiles and runs but breaks at fanction call to OpenCV faunctions -> library specified in Additional dependency is wrong... xxxxxd.lib for debug, and xxxxx.lib for release... if you are building the project under debug mode, you have to use library that the name ends with "d".
    • CV functions return error result eaven if it's getting correct input (result) -> same as above....
    • "Cannot find or open the PDB file" -> Change Setting for debug -> option -> symbol ... Google it... For win7, you need to run as administrator.
    • Nothing happens -> check the path to the Haar Cascade files.

    [Robot Parts] Battery and Power Supply

    Alinco Desktop Power Supply
    This is the power supply I'm using for my development... It supports up to 16V/32A.
    You will need gauge 14 cable and connector for the battery side.

    KTX Battery

    If you have been using the battery for a year, it might be the time you would need a new battery.
    If your battery stop charging, you can try draining out all the charge and charge it back for several times.
    Then,  if your battery still doesn't charge, it's the time to get a new battery.
     Also, you might want to check on the battery charger.... if it's charging, you should see red led light on.
    If not,your charger is not working properly.

    Thursday, April 14, 2011

    [Programming] How to use VSRC003 SDK ~Real Time Motion Control~

    Please complete previous sample "Play Motion File" before working on this.
    >> Play Motion File

    I added "Real Time Motion Control" sample in my example.
    You can move the head yaw servo right and left by using your up and down keyboard keys.
    Please download complete project here >>

    Quick Review

    In main.cpp, first it will call "Vsrc003" class constructor.

        //Vsrc003 vsrc003("../Sample Motion/KTX/initMotion.txt");
        Vsrc003 vsrc003("../Sample Motion/KTX-PC/initMotion.txt");

    If you are using KTX, use the init motion for KTX.

    Inside constructor, it will call startup member function and do initial setup for VSRC003 as I demonstrated in previous tutorial.

    In the startup member function of Vsrc003 class, it has a ServoPowerOff() call.
     
        bool Vsrc003::Startup(char* fpath){
             ServoPowerOff();    //not required...

    If you assume your servo is not powered up before running the software, then you don't need to power off the servo.
    Or, if you want to have the robot powered prior to the excecution of your motion file, you need comment this line out, and add power on function call.
     
    In the "initMotion.txt" file, I used step size of 10steps.
    If you want to have smoother startup, you can increase the step size.
    <!> If you add more steps in poses, it will take more time to finish the motion.


    After loading and playing the init motion, it will load and play "RealTimeMotion.txt".

        //vsrc003.LoadMotion("../Sample Motion/KTX/RealTimeMotionControl.txt");
        vsrc003.LoadMotion("../Sample Motion/KTX-PC/RealTimeMotionControl.txt");
       
        vsrc003.ServoPowerOn();
        vsrc003.PlayMotion(-1);  //-1 for infinit loop

    Once it started, you should be able to move the servo motor by pressing up and down arrow keys.
        cout << "\nPlease press ESC to stop playing motion";
        do{
            //Sleep(16);           //it might cause shaking problem  
            if(GetKeyState(VK_ESCAPE) & 0x80){
                cout << "\nESC is recognized.  Cancel playing motion.";

                vsrc003.CancelMotion();
            }else if(GetKeyState(VK_DOWN) & 0x80){
                value--;
                //update value
                vsrc003.SetValue(variable, value);
             }else if(GetKeyState(VK_UP) & 0x80){
                value++;
                 //update value
                 vsrc003.SetValue(variable, value);

            }else{
                //ignore
            }
        }while(vsrc003.GetStatus() == PLAYING_MOTION);

    <!>The Problem causing the shaking or the situation that the servo moves back to original position, was caused by the control device preference.
    By default, the control device is preset to the remote controller.  Even if the remote controller is turned off, it will overwrites the position of the servo, unless you take off the receiver from the robot.
    What happening here is following:
    1.  SDK sends signal to overwrite a variable (analog stick variable #246).
    2.  Servo moves to the position specified.
    3.  Receiver sends (updates) signal to the memory space assigned for remote input, which also overwrites variable #246 with ZERO
    4.  Servo moves back to the original position (zero degree).
    By setting controller type to "0" (not connected, used for VSRC003SDK) you can disable the remote input, which prevents remote receiver overwriting the value.
    This applies to all the applications use SDK.  
    Please use VSRC003_SetValue(240,0) to set the controller preference to SDK.
    Also, I updated the example 04/27/2011, please check it also.

    Motion Files

    The motion file is really simple.
    One reference pose with one loop block.
    The slider bars are all zeros... except analog stick bar.
    Do not forget setting analog slider bar to non zero. I'm using -20...
    For KTX-PC user..., please download updated Robot Project file.
    I added analog CTRL bar.
    • KTX-PC Pro Robot Project Ver6
    • KTX-PC Robot Project Ver3
    For KTX-PC, your current Robot Project should have analog slider bars...
    Please use slider bar 49 for the analog control of head yaw joint.

    Calculating Output value
    In this example, I'm using variable number 246 to control the servo, which is already assigned to analog stick input of remote controller (already configured for real time motion control usage).

    Here is the actual calculation applied to the servo output value.
    Normally, KTX robots uses CN5-3 for the head yaw servo. Go to CPU preference->servomotor output,  and change servo motor number to CN5-3 (or look for head yaw).

    The above setup is the default on KTX-PC (you will see similar one on KTX also).  
    For this example, you don't need to change anything on servo output preference.
     The Servomotor output preference will be saved into CPU, not with the Robot Project file...

    For KTX users, if you create a new robot project and mark on the check box says "initialize", it will automatically set those servo motor preferences so that it works with this sample code...
    However, for KTX-PC, if your have changed the CPU preference and start having some problems, there is no easy way to fix...because you can not initialize the CPU board for KTX-PC right now... RM2 does not support it.Please give me couple more days to figure this out and will post the result here!!!

    Please READ though the steps explained in this page and DO the steps in Quick Fix.  It will reset the CPU preference so that it works with this sample code.Also, It covers the parameters for the gyros/accel sensor board.  If you have not change your CPU preference yet, please try it now.

    Calculation might looks complecated...., but it is really simple!!!


         x = v26 + Gain1 * v53 / 256 * v246 / 256 + Gain2 * ..........

    The "v26" represents variable number 26 which is the position value specified in the motion file currently playing.

    The Gain is for you to pick... By changing the Gain, you can adjust servo response to your input without changing the motion files.
    In other worse, if you change the gain, it will affect for all the motion files you would play.
    Also, if you want to change its polarity, you will change that by changing the sign of your Gain.

    The "v53"  represents the value obtained from the slider bar value assigned for analog stick.
    Therefore, you have to have non zero on the slider bar...., otherwise the calculation will give you v26 + ZERO.

    v246 is the variable we are updating from our software.


    Rest of the lines have Gain = 0, so they are not affecting.
    If you want add more calculation using addtional sensors and etc..., you can change those lines.

    Please read RM2 user manual section 5-3 for the use of servomotor output preference!!!

    Wrap up
    In this sample, I did not pay attention to the return value of SDK member functions.  You can make it a little better application by taking care of those return value.

    Also, I used analog CTRL bar to be activateion variable; however, you can use your own variable to do the same.
    Especially for the use of multiple servo, you would need....
         - 1 ~ #servo:  a variable to hold the activation of real time control on the servo
         -  #servo:   a variables to hold the position value of the servo.
    If you wants to have 6 servos for the real time control, you will need 7 to 12 user defined variable to operate.

    If your robot or VSRC003 does not response, please check if the RM2 has connection to the board or not.
    You can only establish ONE connection with the board.
    If that;s the case, disconnect your RM2, and press reset button on your VSRC003 and start your software.

    Also, If your CPU board stop responding to your program, try establish connection from RM2 and disconnect. Then, try your program again.  This likely happens after you kill the process without following shutdown process of CPU board.

    Wednesday, April 13, 2011

    [Programming] How to use VSRC003 SDK ~Play Motion File~

    Please Prepare Following

    • VC++2010 Express, or VS2010
    • VSRC003 SDk
    • KTX robot or VSRC003 with servo motor
    You can download complete project file for VSC++ Express here>>
    SDK examples are only available for those who have SDK licence from us...

    1.  Start VC++ and Create new project
         (1)  Start VC++
         (2)  File -> New -> Project -> General -> Empty Project
         (3)  Enter Project name "PlayMotionFile"
         (4)  Enter Solution name "VSRC003SDK Examples"
         (5)  Click "OK"

    2. Copy SDK to Solution folder
        (1)  Create Directory called "VSRC003SDK" inside solution directory
        (2)  Copy "VSRC003_SDK.h", "VSRC003_SDK.lib", "VSRC003_SDK.dll", and "rclib.dll"


    3.  Writing Code
         (1)  Create a new c++ file called "main.cpp", right click on "source files" -> add -> new and select cpp file and enter a name.
         (2)  Write code....
                Please download files here and look at the code...
       
    4.  Build  Solution
         (1)  Go to Project Property -> Linker -> Input -> additional Dependency  -> edit and add "VSRC003_SDK.lib"
         (2)  Build solution

    5.  Prepare motion file
         (1)  Create init motion

                Open RM2 and create init motion.  your initi motion should contain 3 to 5 poses of your starting pose.
                For example, if the motion you would play starts from standing up position, you will be creating init motion with standing poses.
                If you need shorter activation time for your software, you can decrease step size to smaller value.
         (2)  Create motion file

                You can create or use existing motion for the demonstration.
                To use "loop" feature of VSRC003_PlayMotion(int loopnumber), you must have loop block inside the motion file.

    6.  Run 
         (1)  Add "VSRC003_SDK.dll", and "rclib.dll" to your output directory (VSRC003SDK Examples/Debug)
         (2)  start debugging

    7. Play motion file
         (1)  Chose init motion
                If you run the code, it will first ask you to select init motion.
                Please select the init motion you created.
         (2)  Chose motion file you want to play
         (3)  enter number of loop.  Enter -1 for infinit
         (4)  You can press ESC key to stop playing motion.

    Friday, April 8, 2011

    [Robot Parts] Upgrade Kits

    KTX (Robovie X) High Power Kit C with Servo
    This upgrade kit will help stabilize the motion and gives more availability to programming motions.
    You can make the robot standing on one reg!
    It comes with all the parts you need for upgrading.
    The servo motor used in this kit are three times stronger than the regular one.
    It uses metal gears, which gives more stability and accuracy.

    [Robot Parts] Servo Motor

    VS-S092J
    This servo motor is used for KTX humanoid robots (Not Pro versions).
    Specifications:

    • Size:38 x 19 x 38.5mm
    • Torque:  9.2kg・cm (@7.4V)
    • Speed:  0.11S/60°
    • Weight:  42g
    • Range:  180°
    • Operating Voltage:  4V~9V
    • Input Signal:  PWM
    • Length of the cable: 400mm
    VS-S281J

    This servo motor is used for KTX Pro versions, such as KTX Pro and KTX-PC Pro.
    The servo has metal gears and stronger motor, which improve the accuracy and stability.  It has three times more power than regular servo.
    It is a little bigger than VS-S092J, so you would need servo holder and bracket for this servo.
    Specifications:
    • Size:  38×21×41(mm)
    • Weight:  70g
    • Torque:  28.5kg・cm (@7.4V)
    • Speed:  0.14s/60°
    • Range:  180°
    • Operating Voltage:  4V~9V
    • Input:  PWM
    • Cable:  400mm
    • Other:  Comes with alminum servo horn
     RBS-5802

    This servo motor has the same shell design as VS-S092J, which allows easy replacement of standard servo with more powerfull servo.  It has metal gears and stronger motor than standard servo.
    • Size:  38 x 19 x 38.5mm
    • Torque:  17kg・cm (@7.4V)
    • Speed:  0.13s/60° 
    • Weight:  47g
    • Range of Motion:  180°
    • Operating Voltage:  4V~9V
    • Input Signal:  PWM
    • Cable:  40cm

    Wednesday, April 6, 2011

    [Programming] Writing Wrapper for Native Code ~What is SWIG?~

    I cannot believe this...
    I spend so much time just writing all kinds of wrappers for stupid native codes...
    Well,... SWGI can do it for you...

    Following is the copied description on SWIG from their website... 

    What is SWIG?

    SWIG is a software development tool that simplifies the task of interfacing different languages to C and C++ programs. In a nutshell, SWIG is a compiler that takes C/C++ declarations and creates the wrappers needed to access those declarations from other languages including including Perl, Python, Tcl, Ruby, Guile, and Java. SWIG normally requires no modifications to existing code and can often be used to build a usable interface in only a few minutes. Possible applications of SWIG include:
    • Building interpreted interfaces to existing C programs.
    • Rapid prototyping and application development.
    • Interactive debugging.
    • Reengineering or refactoring of legacy software into a scripting language components.
    • Making a graphical user interface (using Tk for example).
    • Testing of C libraries and programs (using scripts).
    • Building high performance C modules for scripting languages.
    • Making C programming more enjoyable (or tolerable depending on your point of view).
    • Impressing your friends.
    • Obtaining vast sums of research funding (although obviously not applicable to the author).
    SWIG was originally designed to make it extremely easy for scientists and engineers to build extensible scientific software without having to get a degree in software engineering. Because of this, the use of SWIG tends to be somewhat informal and ad-hoc (e.g., SWIG does not require users to provide formal interface specifications as you would find in a dedicated IDL compiler). Although this style of development isn't appropriate for every project, it is particularly well suited to software development in the small; especially the research and development work that is commonly found in scientific and engineering projects. However, nowadays SWIG is known to be used in many large open source and commercial projects.

    Tuesday, April 5, 2011

    [Programming] Using KTX (VSRC003) SDK


    Overview

    KTX (VSRC003) SDKis software development library for KTX users.  By using this library, you can upload and play the motions created by RobovieMaker2.

    Currently, this SDK will be available "Free" to all the customer who purchased KTX Pro series (KTX Pro, KTX-PC Pro).  For other customer who does not have Pro, you can get SDK for $99. 

    Or, you can get SDK for "Free" by contributing KTX technical support.  Your contribution could be making documentation, posting your project, writing some code, ...etc... Contact us for more information!!!

    How to Use
    For C++, include "VSRC003_SDK.h" and build with "VSRC003_SDK.lib", and make sure that "rclib.dll" and "VSRC003_SDK.dll" are in your excecution directory.

    For VC++ 2010 Express, go to 
    project property -> Linker -> Input -> additional dependency -> edit
    and add "VSRC003_SDK.lib".

    For C#, write wrapper for VSRC003_SDK ....

    Sample code